NTUST報帳資料

請購注意事項:

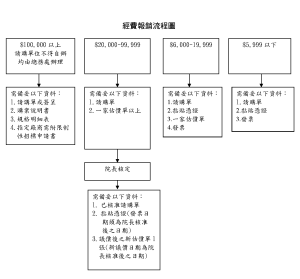
  1. 請先看經費報銷流程圖。經費報銷流程圖pdf

  1. 請購單上之請購日期請填發票日期前一日。
  2. 郵票、影印費需獨立報支;郵票多張單據可以張貼一起。(郵票單筆採購超過一仟元需附郵寄地點)
  3. 採購金額10000 元以下可選擇支付貨款方式。
  4. 採購金額10000 元以上需由學校開立支票付款,或承辦人填妥廠商之撥款銀行帳號,俾便撥款。
  5. 物品單價一萬元以上需附財產驗收單,若為消耗性物品須先註明於請購單用途說明處。
  6. 二萬元以上之請購案需請系採購人簽承辦人欄,附估價單二張,待批准後,系承辦人再議價一次,
  7. 附上減價紀錄表,若無法減價,廠商需加註說明。
  8. 傢俱辦公桌椅、掃描器、燒錄機、數位相機、印表機…等電腦用品,採購需向中信局採買。(請自行
  9. 上中信局網站http://sucon.pcc.gov.tw/訂購,並請列印訂購單連同請購單一併送出)。
  10. 維修設備儀器,需填寫財產請修單且附財產卡。

繼續閱讀

the era of digital sketching

the role of freehand sketching has been described as important and even dispensible in the design process as the motivator for creativitiy and production. The characteristics of sketches, such as vagueness, discrunity, overlayered, contributes greatly to producing ideas and advancing the design process.

With the progress of CAD technology, major part of the design process could be enhanced by differerent CAD system. In traditional method, freehand sketches, 3D model, and working prototype have been used to carry out the design process to finally create the end artifacts of design. The drastic advances of 3D modelling software has replaced these media successfully. However, some researches have been advocated that the role of freehand sketches could not be taken by CAD system. The fundamental difference of their features, precise and vagueness, has prevented the freehand sketches be replaced by any CAD systems.

Many sketches-based CAD systems have been established by Gross and DO, but most of them failed to fulfill the basic requirements of freehand sketches, the vagueness and tinyness. Their research provide a theoretical fundation to establish a better sketches-based CAD system, but still the simple basic of sketching behaviors do not exist in their systems.

The emerging problem is that there is always a missing part of the whole CAD process. The beginning is different. The new generation of designers have shown their abilities to design with 3D modelling from struch. The researches of Liu have shown the CAD could be used in the conceptual design process in Architectural design, and it provides different stimulats compared to freehand sketches. However, it would really makes the CAD process completed if we can establish a computer aided concepual design that has the basic features of sketches.

Most of the computer-mediated collaborative design system focused on the communicative roles of the design process. Very few can facilitate the collaborative design process. If the ideal computer aided concepual design could be established, combining with the internet technology, we can have long-distance design collavoration in designing not only communicating.

This study proved that our system is similar to freehand sketches. Therefore, combining our systems and the theory-proving systems of Gross and Do, we will be able to aid the completed design process from idea generation to manifacture.

SO this is the era of digital sketches.

CSS files in DotNetNuke: Which CSS file should I use?

FROM Location: BlogsAnthony Glenwright’s Blog

Some tips for choosing which CSS file to use in DNN for your custom CSS elements.
I get a lot of posts asking about which of DotNetNuke’s CSS files that a portal administrator or web designer should put their custom CSS styles in – especially when end users are customizing the appearance of our SideMenu and TopMenu modules.

DotNetNuke (with a little help from HTML and CSS, of course) gives you a huge amount of flexibility in the layout and design of your website, web portal or web-based application. You can do anything from tweaking a font size or colour here and there to starting a “skin" design from scratch – and DNN implements what I call a “5-tier" model for CSS, where CSS elements for different purposes belong in different CSS files.

Some technical background
The five tiers discussed in this blog are an abstraction – a way of thinking about where to put your CSS to structure it best. Technically, it doesn’t matter which .css file you use – when you have references to multiple CSS files in HTML, they all get counted when the browser renders your output.

The 5 Tiers
module.css:
module.css files exist in the /DesktopModules/[modulename] folder. If there isn’t one already there, you can create the file and it will automatically get used.
Generally I leave the module.css files alone, and reserve them for CSS that the module developer wants to include. If a module developer includes a module.css, it will get overwritten when you next upgrade the module, so it’s a bad place to put your custom css.

portal.css:
portal.css is located in the /portals/[portalid] folder – there’s one for each portal running in your DNN installation. Use portal.css for styles that are intended to be portal-wide. That is, the CSS in portal.css should be intended to affect all skins & pages in your portal. portal.css doesn’t get overwritten when you upgrade modules (or the DNN core), so it’s a safe place to put your custom CSS. I generally create my own skins for each portal, so I tend to use skin.css in favour or portal.css. But if you are using purchased or downloaded skins, this is the best place to put your custom CSS because your skin.css file would be overwritten if you upgrade the skin.

skin.css:
skin.css files are created as part of the skin package – for more detailed information about creating skins, refer to the DNN documentation.
If you control the skin you are using (that is, if you created it yourself instead of purchasing one or using one of the skins that comes with DNN), skin.css is the best place to put your custom CSS elements. The elements in skin.css only affect the skin that the skin.css is for (and all the containers and modules, of course).

container.css:
container.css files are created as part of the container package – for more detailed information about creating containers, refer to the DNN documentation.
container.css should be used for elements that are intended to affect a specific container or group of containers and the modules within them.
portals/_default/default.css:

The default.css file contains CSS defined by the DNN core. This could get overwritten in a DNN upgrade, so it’s safest to leave it alone. However, it contains some non W3C-compliant CSS, so I usually edit it to make it pass the W3C validator.

Summary
The short answer: For custom CSS, if you are designing your own skin, use skin.css. If you are using pre-packaged skins, use portal.css.
The way DNN structures it’s CSS files make CSS seem modular (which is a good thing), but every CSS file referenced within the HTML page that DotNetNuke generates can affect your entire page. There’s no technical reason you can’t put a BODY {background-color: red} in a module.css file, which would affect your entire page, not just the module.

If you exercise some discipline over where you add your own CSS, then the modular nature of the DNN CSS classes works well. If you don’t, it can be very confusing.
DNN Skinning – style-sheets & testing

Kewley on Kode spent some time this weekend on a personal project, trying to fit a web site template that I purchased from TemplateMonster.com into a DotNetNuke portal. The template that I was trying to adapt appeared to me to be a good candidate for a portal-type framework, and an opportunity to try out some of the portal and container skinning features.

The first thing I did was read the skinning documentation that came with DotNetNuke. It’s decent documentation, but the problem is that it touches on so many items that it tends to leave a number of unanswered questions about specifics. I hacked around the generated HTML for a portal page and eventually came up with a better understanding of a few things:

Don’t include references to your style-sheets in your skin and container skin pages. I included these references while building the individual HTML files, and ended up leaving them in during publish. This isn’t necessary. as DotNetNuke will put the css files in known locations and include {link} tags that make reference to them in the appropriate locations. Including a style-sheet reference in your container template will result in a style-sheet reference per container on your rendered portal page, which screws up the by-design hierarchy of styles.

Don’t include {body} or {head} references in your skin HTML files. Again, I had inserted them during the testing phase of my HTML build out. Leaving them in resulted in multiple {body} tags in the rendered portal page. You can (should) achieve the same results that you seek from this type of approach if you:

Learn the built in CSS entities. The portal and containers render with pre-determined class names in various places. You must learn what they are in order to accurately build out your site. Rather than combing through the rendered HTML for class references that are not your own, instead refer to {install point}\Portals\_default\portal.css and {install point}\Portals\_default\Skins\DNN\skin.css. Some notes:

Each portal page renders the style-sheets in the following order:
{install point}\Portals\_default\default.css – the default install template. If you’re trying to figure out there are still dark backgrounds on your portal, it’s probably because you didn’t override a property in this style-sheet.
{install point}\Portals\{active portal}\skins{\active skin}\skin.css. This is the skin.css that you uploaded with your skin package
{install point}\Portals\{active portal}\containers\{active portal container}\container.css. This is the style-sheet of the default container assigned to the portal
{install point}\Portals\{active portal}\portal.css – Set n portal admin / Site Settings from an available skin’s style-sheet

The style that is defined closest to the bottom of the list above will be the style that renders. For instance, if you define .Head (the style for the header bar on a container) in your container or skin, it will override the default setting that is defined in the default.css file.

The SolPartMenu global menu has a large number of settings that you can override in the .XML file that accompanies your skin or container package. That process is a pain – the quick approach for simply trying to get it to look right is to override the Menu settings in your skin css file. Refer to the css class names at the bottom of the {install point}\Portals\_default\Skins\DNN\skin.css file

My approach was to upload the skin and container, then open the four files referenced above and edit/save/refresh to see how the site was affected by css tweaks. When I got to a point where I felt comfortable with the rendered page, I’d update the container package with the new css file and re-upload it.

In order to help target specific page locations, I assigned IDs to some of the table rows in my container HTML file. This let me do things like define a style for a generic HTML entity such as a within a specific page area, like one named #GreenContainerContent

Handle the spacing between your portal elements at the skin level. One-off nudging of space between containers with borders on the container.

All in all the framework that supports skinning is pretty good. I think I’ll post some more in the near future about how the styles on the SolPartMenu work.

師者,所以傳道授業解惑也。

古云:師者,所以傳道授業解惑也。
現在的師生關係,已演變成此三者之外的利益交換關係,老師是知識經濟的提供者,學生是消費者,所以一切依消費購買關係重新界定,這是十分可惜的。
對我而言,能夠教導學生我所認為的正確的事情,比技術的傳授更加重要。所以尊重、認真、負責,比論文寫好、實驗作好更加重要。
老師對學生的要求,是出自於對學生的訓練,而不是對於其他利益的追求。

Lite-On 演講摘要

國內設計演講常常以時尚潮流為題,似乎認為工業設計的主要目的就是絢麗的外型與風潮的材質與顏色,但是常聽到受邀的演講者一開始就說工業設計和流行無關。
Ralph Wiegmann提出工業設計是創造潮流,而非追隨潮流,設計能夠擊中人心的關鍵在於「真實」,真實而值得信賴的故事。 德國f/p設計公司總經理樊克樂則強調人性設計,希望一件工業產品在產出後30年依然為使用者所喜愛。所以如何產生容易使用但不是簡單的產品,則是設計的重點,就如同即使有強大的PDA人們還是使用筆記本。